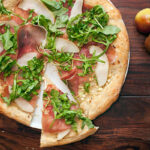
I love the sweet-sour-salty flavor collision of this exciting pizza.
Makes 6 pizzas
2 pounds purple onions
1 pound yellow onions
¼ cup unsalted butter
2 tablespoons extra virgin olive oil, plus extra for brushing pizzas
3 tablespoons granulated sugar
6 tablespoons red wine vinegar
salt to taste
½ pound gorgonzola dolce, refrigerated
2 cups very finely chopped parsley
1. Peel all onions, cut them in half, and slice thinly. (This may look like a lot but once cooked the volume reduces drastically.)
2. Heat the butter and oil in a large sauté pan over medium heat. Add onions and cook, stirring occasionally, until the onions are soft and caramelized. This will take about 1 hour.
3. When onions are cooked, stir in the granulated sugar and the red wine vinegar. Add salt to taste. Reserve.
4. Place gorgonzola in the freezer for a few minutes (it’s easier to handle when it’s very cold). Crumble gorgonzola, then return to refrigerator.
5. When ready to cook pizzas, roll out three of the dough balls (instructions in Master Pizza Dough Recipe above). Brush each pizza with a little of the extra olive oil. Place pizzas, oil-side-down, on the fire. Cook pizzas on one side. Turn over, and spread the browned side of each pizza with 1/6 of the gorgonzola, well-distributed across the pie. Top the gorgonzola on each pizza with 1/6 of the onions. Cover. Take the pizzas off the fire when the gorgonzola has melted, making sure the underside hasn’t burned. Immediately top each pizza with 1/6 of the parsley leaves.
6. Bring pizzas to buffet table, and cut into 12 pieces on wooden board. Offer to guests.
7. Return to grill, and prepare three more Gorgonzola and Caramelized Onion Pizzas.
Master Pizza Dough Recipe
One great virtue of this grilled pizza recipe is the time and trouble it takes to make the pizza dough—very little! Even neophyte dough workers can create a great crust quickly. One thing that helps is the “look” of the finished product; these pizzas are far from perfect rectangles. That removes the pressure! One of my favorite practitioners of grilled pizza is Vincent Scotto, a New York chef who used to work at Al Forno—and his pizzas, from a recipe like this, look like rough, improvisational ovals. Spectacular!
Makes enough dough for 24 pizzas, each one measuring approximately 6″ x 10″
6 cups lukewarm water
3 tablespoons rapid dry yeast
¼ cup granulated sugar
½ cup kosher salt
½ cup plus 2 tablespoons extra virgin olive oil
about 8 cups bread flour and 8 cups all-purpose flour
1. In a large bowl combine water, yeast and sugar, and let sit until the mixture looks foamy with bubbles on the surface, about 15 minutes.
2. Stir in salt and olive oil.
3. Combine flours, and add about ¾ of the combined flour to yeast mixture. Stir solids and liquid together; it’s not necessary to knead. The mixture should be soft and sticky, but still firm enough to form into rounds. If it’s not firm enough, gradually add more flour. When the dough feels right, divide dough into 24ths, and form 24 balls.
4. Oil two baking sheets. Place the balls about 2 inches apart on the baking sheets. Cover with plastic wrap or clean tea towels and let sit at room temperature for 40 minutes.
5. To roll out the balls, dust a counter or cutting board with flour. You may have to add flour to the pizza while rolling as it will be slightly sticky. Roll each ball into a rough rectangle that’s about 6″x10⅛”—but the only really important measure is the thickness (⅛”). The shape of the rolled-out dough can be irregular.
PLEASE NOTE: I like to use the rolling pin as little as possible. Yes, I give the dough a preliminary pass under the roller—but I find that the more you stretch it out by hand, sort of like the quintessential pizza-flinging guy at the pizzeria, the springier and flakier the finished product is. Remember: you’re not looking for perfect rectangles!
6. Place the first piece of rolled-out dough on a platter, then cover with parchment paper or plastic wrap. Roll out another piece, cover with another sheet of paper or wrap, then roll out the third. You will cook the pizzas on the grill three at a time…so you can wait until the first three pizzas are cooked before you roll out the next three.
IMPORTANT NOTE ON COOKING PIZZAS: The basic technique in grilling pizza is to brown one side over a hot fire, then flip the dough over and place the pizza toppings on the already-browned side. What you want at this point is for the toppings to warm, and/or melt, before the underside of the pizza gets too brown. It is a good idea, once you’ve flipped the pizzas, to place a cover on the grill so that the heat stays trapped inside, and warms the toppings more quickly. If the undersides are cooking too quickly, you can always move the pizza to a “cooler” side of the fire as the toppings warm.